
How to Compress Images Without Losing Quality
Learn practical ways to reduce image file sizes while keeping them sharp. Covers lossy vs lossless compression, best web formats, and a browser-based workflow.

Key Takeaways
- •Lossy compression at quality 70–85% typically reduces file size by 50–80% with minimal visible change.
- •WebP delivers 25–34% smaller files than JPEG at equivalent quality, and is supported by roughly 97% of browsers globally.
- •Browser-based compression tools process your images locally, so nothing leaves your device.
- •The right format matters as much as the compression level — PNG for transparency, JPEG for photos, WebP for both.
On This Page
Large images slow down websites, bounce emails, and eat through mobile data. The good news: you can cut file sizes dramatically — often by 60–80% — without any visible difference to the human eye.
This guide breaks down how image compression actually works, which formats and quality settings give you the best results, and how to compress images right in your browser with no uploads to a server.
How Image Compression Works
Every digital image is a grid of pixels, and each pixel stores color information. Compression reduces the data needed to represent that grid. There are two approaches, and they work very differently.
Lossy Compression
Lossy compression permanently removes data that the human eye is unlikely to notice. JPEG is the most common lossy format — it uses a mathematical technique called the Discrete Cosine Transform (DCT) to discard fine details in areas where you won't see the difference.
The trade-off is straightforward: lower quality settings mean smaller files but more visible artifacts. At very low settings (below 30%), you'll see blocky patches and color banding. At moderate settings (70–85%), most images look nearly identical to the original.
Lossless Compression
Lossless compression reduces file size without discarding any data — the decompressed image is bit-for-bit identical to the original. PNG uses this approach with DEFLATE compression. The savings are more modest (typically 10–30% smaller than uncompressed), but you get a perfect copy.
Lossless makes sense when every detail matters: logos, text overlays, screenshots, or illustrations with sharp edges.
Which Should You Use?
| Scenario | Best approach | Why |
|---|---|---|
| Photos and posters | Lossy (JPEG or WebP) | Photos have natural noise that hides compression artifacts |
| Logos and icons | Lossless (PNG or SVG) | Sharp edges and flat colors show lossy artifacts clearly |
| Web pages and email | Lossy at 75–85% quality | Best balance of size and quality for fast loading |
| Print or archival | Lossless (PNG or TIFF) | Preserving full detail is more important than file size |
Choosing the Right Image Format
The format you pick has as much impact on file size as the quality setting. Here's what each format actually does well.
JPEG
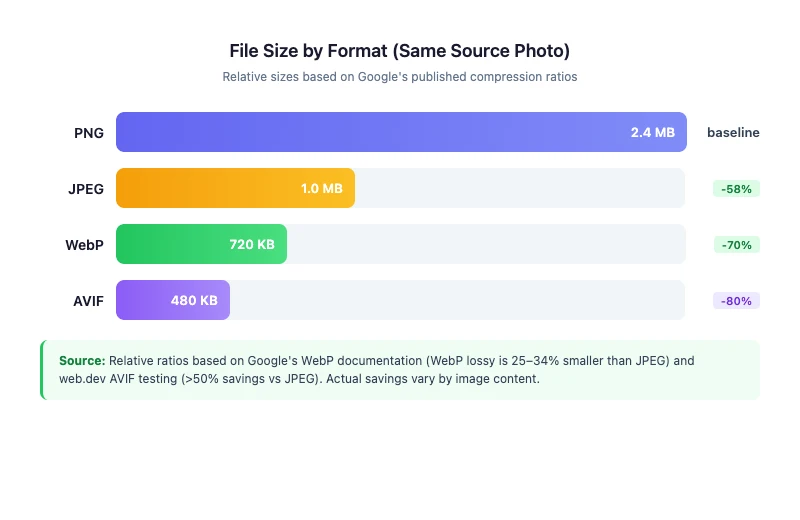
The default for photographs. JPEG handles gradients and complex color transitions well but doesn't support transparency. A 5 MB photo typically compresses to 500 KB–1 MB at quality 80 with no noticeable loss.
PNG
Best for images that need transparency or have sharp text and lines. PNG files tend to be larger than JPEG for photographs because the lossless algorithm can't exploit the same perceptual shortcuts. Use PNG when you need a pixel-perfect result, not when you need a small file.
WebP
Developed by Google, WebP supports both lossy and lossless compression — and does both better than the older formats. According to Google's own testing, WebP lossless images are 26% smaller than PNG, and lossy WebP images are 25–34% smaller than equivalent-quality JPEG. WebP also supports transparency, which JPEG doesn't.
Browser support is no longer a concern. As of early 2026, WebP is supported by roughly 97% of browsers globally, including Chrome, Firefox, Safari, Edge, and all major mobile browsers.
AVIF
The newest option. AVIF can achieve over 50% savings compared to JPEG in some cases, with better quality at the same file size. Browser support is growing but not as universal as WebP yet. If your audience uses modern browsers, AVIF is worth considering for maximum compression.
Quick Format Comparison
| Format | Compression type | Transparency | Browser support | Best for |
|---|---|---|---|---|
| JPEG | Lossy | No | Universal | Photos, posters |
| PNG | Lossless | Yes | Universal | Logos, screenshots, text |
| WebP | Both | Yes | ~97% globally | Web images (best all-rounder) |
| AVIF | Both | Yes | ~93% globally | Maximum compression on modern browsers |
What Quality Setting Should You Use?
Google's guidance on image optimization is intentionally flexible: experiment with compression levels to find the right balance for your specific images, rather than following a single universal number.
That said, practical experience with typical images points to clear sweet spots:
- 90–100%: Minimal compression. File stays large. Only useful for archival or print prep.
- 75–85%: The practical sweet spot. Most photos and posters look identical to the original at this range while cutting file size by 50–70%.
- 50–74%: Visible but acceptable for thumbnails, email previews, or social media where speed matters more than pixel-level quality.
- Below 50%: Artifacts become obvious. Avoid for anything user-facing unless file size is extremely constrained.
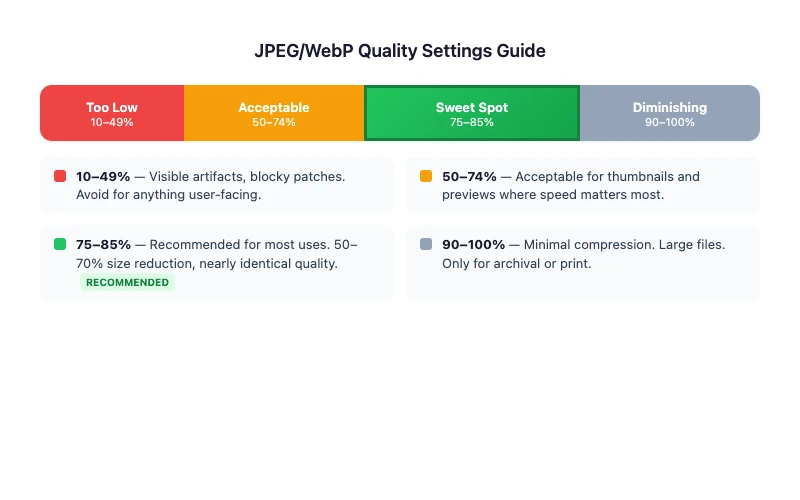
For most web use, 80% quality is a reliable default. It consistently produces files that look sharp while being small enough for fast page loads.
How to Compress an Image (Step by Step)
You don't need to install software or upload files to a server. Poster.sh's image compression tool runs entirely in your browser using the Canvas API — your images never leave your device.
Step 1: Open the Tool
Go to poster.sh/tools/compress-image. The tool accepts JPEG, PNG, and WebP files.
Step 2: Upload Your Image
Drag and drop your image or click to browse. You'll immediately see a preview of your image along with the original file size.
Step 3: Adjust the Quality Slider
The quality slider ranges from 10% to 100%, defaulting to 80%. As you adjust it, the tool shows a real-time estimate of the output file size — so you can see the trade-off before committing.
A few things to know:
- PNG files are automatically converted to WebP during compression, because WebP achieves significantly better compression than PNG for most images.
- JPEG files stay as JPEG, preserving compatibility.
- WebP files stay as WebP.
Step 4: Compress and Download
Click the compress button. Processing happens instantly in your browser. The compressed file downloads with a -compressed suffix added to the original filename.
When to Use the Format-Specific Tools
Poster.sh also offers specialized compression tools for specific workflows:
- Compress JPG — When you specifically need JPEG output and want to compress JPEG files only.
- Compress PNG — Optimizes PNG files with an option to output as WebP for better compression.
- Reduce Image Size — When you need to hit a specific file size target, such as reducing an image to under 100 KB for an upload form or email signature.
Common Use Cases and Recommended Settings
For Websites and Blog Posts
Target: under 200 KB per image for above-the-fold content, under 500 KB for in-article images.
Use WebP format when possible. Set quality to 75–80%. If your site uses Next.js or another framework with built-in image optimization, compression happens automatically at build time — but pre-compressing source images still reduces build time and storage costs.
For Email Attachments
Gmail limits attachments to 25 MB per email (with encoding overhead, the effective limit is closer to 17–18 MB). If you're attaching multiple images, compress each to under 500 KB to stay safely within limits.
JPEG at quality 70–80% works well for email. Avoid PNG for photographs in email — the files will be unnecessarily large.
For Social Media
Most social platforms re-compress uploaded images anyway, so there's a floor below which your effort won't help. That said, uploading pre-compressed images at the platform's recommended dimensions avoids double compression artifacts.
General guidance: JPEG or WebP at quality 80%, sized to the platform's recommended dimensions before compressing.
For Posters and Print
If the final output is print, keep the highest quality you can. Use PNG or TIFF for the master file. Only compress copies intended for web or sharing — never compress the source file you'll send to a printer.
For web-shared poster previews, JPEG at quality 80–85% strikes the right balance between file size and visual impact.
Bottom Line
For most web and email workflows, compression is worth it as long as you start from a clean source file and pick settings that match the job. That holds for the formats and browser behavior we verified on April 14, 2026, but it stops being good advice when the file is headed to print, repeated lossy saves are already stacking artifacts, or the image contains sharp text and transparency that should stay lossless.
Frequently Asked Questions
- Does compressing an image reduce its dimensions?
- No. Compression changes how pixel data is stored, not the image dimensions. A 3000×2000 image at quality 80% is still 3000×2000 — it just takes up less disk space. If you need to change the actual pixel dimensions, that's resizing, which is a separate step.
- Can I compress an image multiple times?
- You can, but each round of lossy compression degrades quality further. JPEG artifacts compound — compressing a JPEG that was already compressed at low quality will make it noticeably worse. Start from the highest-quality source you have, and compress once at your target setting.
- Is WebP always better than JPEG?
- For file size, usually yes — WebP at the same visual quality is typically 25–34% smaller than JPEG. But "better" depends on your workflow. If your target audience or platform doesn't support WebP (rare in 2026, but possible for legacy systems), JPEG remains the safer choice.
- Will browser-based compression work on large files?
- Browser-based tools process images using your device's memory and CPU. For most images under 20–30 MB, this is fast and reliable. Very large images (100 MB+ raw files from DSLRs) may be slow or hit browser memory limits. For those, desktop tools like ImageOptim or Squoosh's CLI are more practical. --- *This article was last verified on March 25, 2026. Browser support data and platform-specific limits may change — check the linked official sources for the latest numbers.*
Compress Your Images Now
Drop an image into our free browser-based tool. No uploads, no installs — just smaller files in seconds.
Open Compress Image Tool

